DanceForms Exercises are From: The Practical Guide (see the PDF)
Handout #01
Exercises 1and 2 - and your first "rough sketch" animation
Exercise 1 is just below
Jump to "Rough Sketch" (below)
Jump to Exercise 2 (below)
Exercise 1 - checking out the workspace
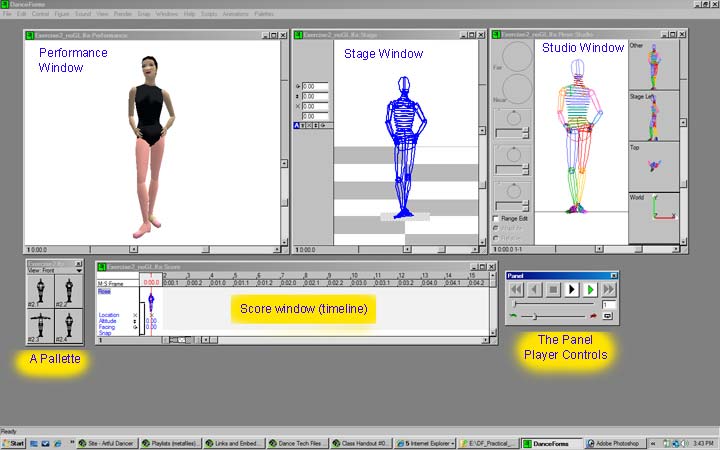
Exercise 1 - checking out the workspace
Familiarize yourself with each of the windows (except for the "Panel") check out all the scroll bars and other controls in the window. Check out the perspective (wedge-shaped) scroll bars to see how the image changes (zooms). The plain horizontal and vertical scroll bars move the image in horizontal (x) and vertical (y) directions. Check out how the rotation scrollers work (the split scroll bar areas).
Note how the same types of controls work across all the windows.
Note that hitting the "A" key puts your figure in the center of the frame (such as after you lose the figure with the scroll or zoom bars). Note also that various windows perform the same action at the same time, just different types of views.
Stage - performance space manipulation (in wire frame)
Studio - individual-dancer manipulations
Score - (the timeline)
Note that each timeline (score) represents a single dancer. Adding a dancer
means adding a score (timeline)
Panel - control panel - video controls
This is the standard set of video play, pause, etcetera controls.
Two differences from other player-type contols. On the bottom right is a button
which can be "pressed" (clicked) to toggle a loop (play again and
again, or play one time). Also on the bottom is a tempo slider. On the left
is a little tortoise icon (slow, of course) and on the right is a hare icon
(fast, of course).
Performance - The rendering window
Here is where the wire-frame is filled in and rendered with skin and clothing.
Sketching It Out
In order to make DanceForms more useful as a choreographic tool, in this course we will try to emphasize a sort of "rough sketch" usage. In the past we've gone through the early steps and tried to refine the work from the start. While that looks nice it is also very labor-intense for a small result and we seem to get bogged down in getting from one step to the next, so to speak. So the first thing is to get a human figure on our stage and moving around. In this exercise we will be less interested in refining actions. We will be more interested in getting the broad outlines of movement and position across the stage.
1 - A New Project
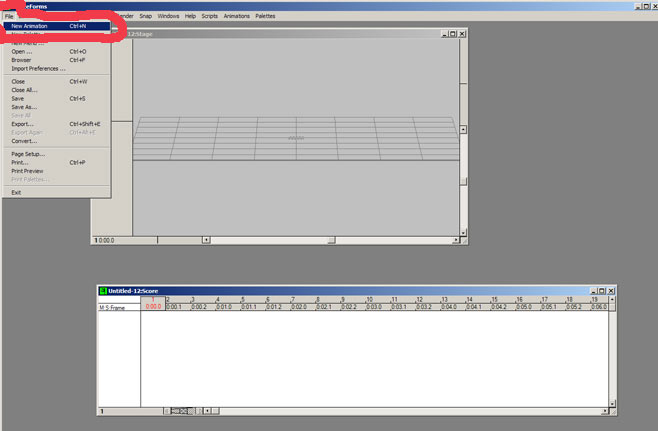
Menu: File / New Animation
You will get a dialog asking whether you wish to close all animations. Generally answer Yes.
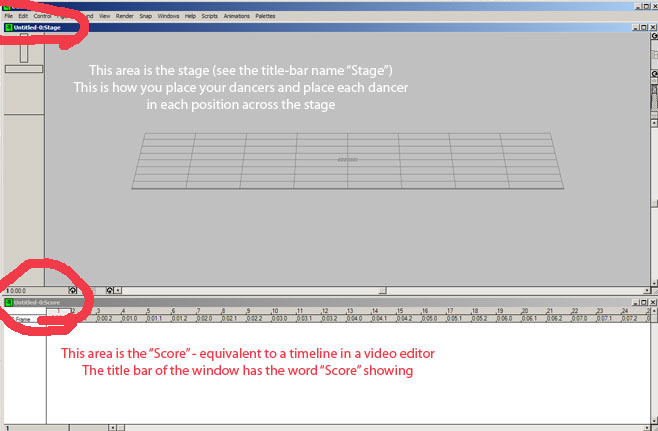
This brings up a new screen with two large windows, the Stage (for positioning dancer locations) and the Score (for holding each dancer and for noting keyframes for each dancers).
2 - A Human
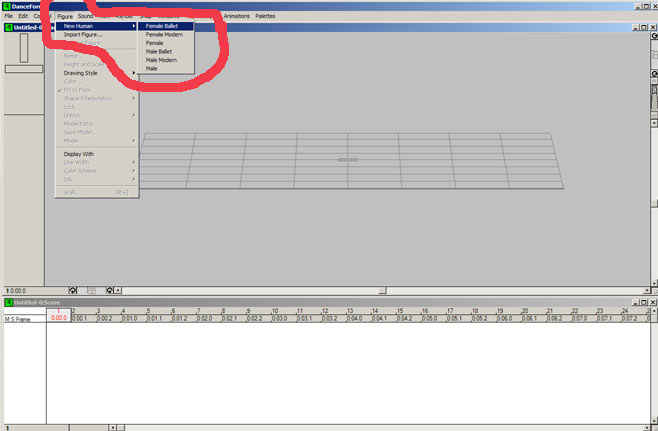
The stage is empty. So add a dancer to the stage.
Menu: Figure / New Human (choose one, The choices denote difference in gender and clothing. In terms of function, they all do the same moves)
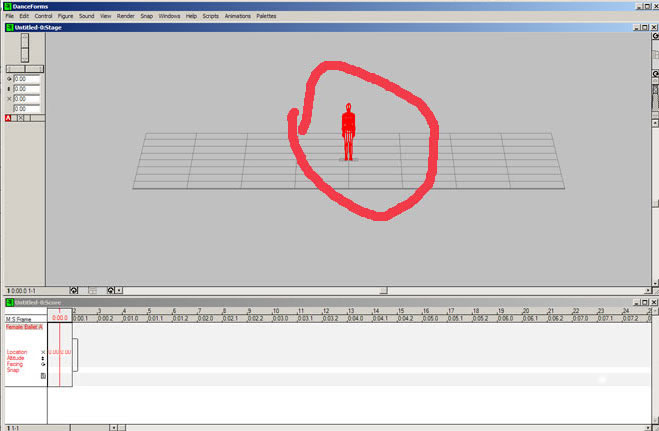
This places a standing dancer at the center of the stage looking out at you.
At the same time a track is opened in The Score window for the new dancer
3 - A Pallette
Time now to bring in a library (called a pallete) or two of possible moves. So we need to open a few pallets.
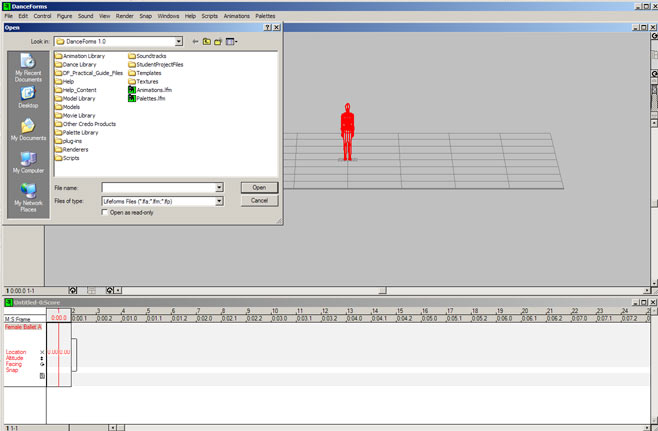
Menu: File / Open
This brings up a file-open dialog. Use this to locate a pallete file. This will have a filename extension of "lfp" (Stands for Life Forms Pallette. LifeForms is the animation software which runs Dance Forms).
Locate the "DF_PracticalGuide" folder and in that folder click to open the pallette "BasicPositions.lfp"
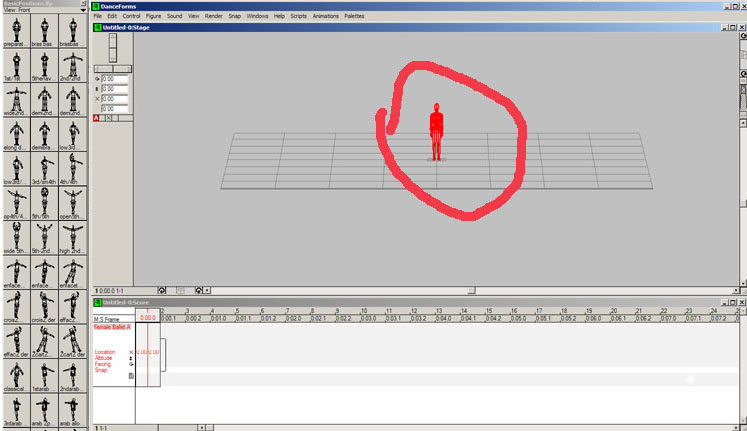
This will bring up a toolbox-looking panel with small thumbnails and position names underneath
We are going to start with one of the positions in the very first frame.
But before we do, lets bring in some music.
4 - Music
Menu: Sound / Sound File ...
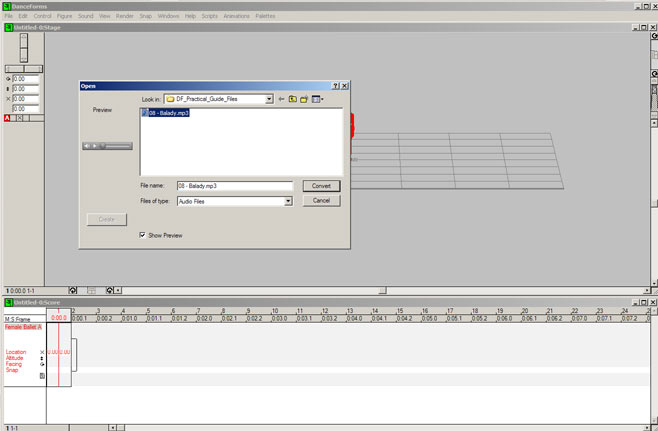
This brings up another file dialog. It will be looking for "movie" files. change the file type to "audio" files.
Pick an mp3 or an mov audio file
NOTE: One quirk of DanceForms is that when you "Export" the file as a video (see instruction below) if the music is longer than the play time of your dancer, the video will not stop at the end of the dance. Instead, DanceForms adds blank time to the video. To avoid this you will need to edit your music file for the right length.
5 - Add Positions
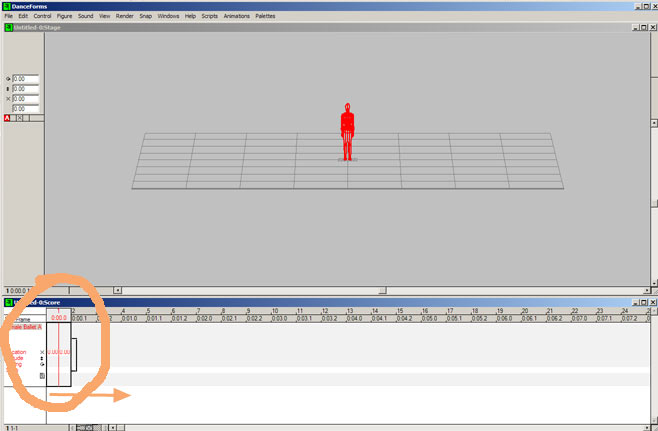
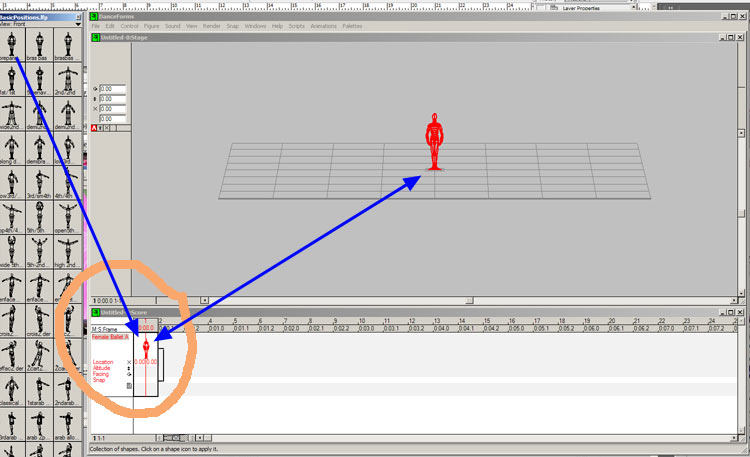
Select the very first frame in the Score by dragging your cursor across it. Now click on the position in the pallette you want to start with. For ease of example start with frame #1
Now you have a thumbnail sitting in the Score window in that first frame.
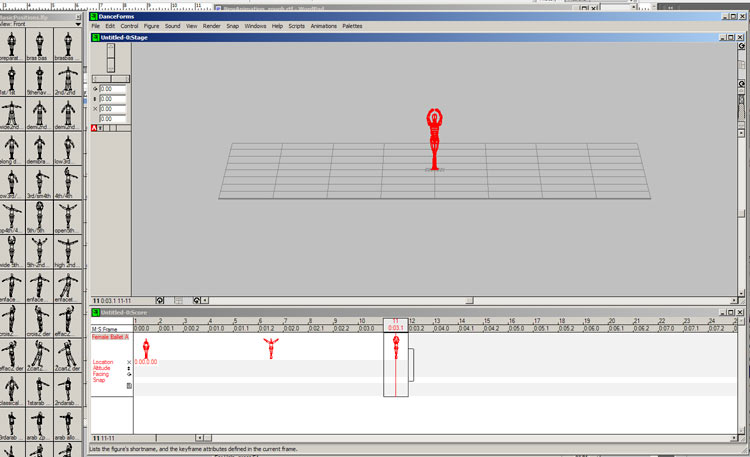
Add two more positions, always by selecting a frame. For now add something which remains in the same spot.
And let's play this first one. If you do not have a small player-control panel on the screen, go to the Windows menu and choose the "Panel" option. Use the double chevrons to make sure the frame is at number 1, then click the yellow play arrow.
You will see the figure move to the music
6 - Add some forward motion
Look for a few more positions to add. Each time you do, "grab" the figure on the stage and move it to another location.
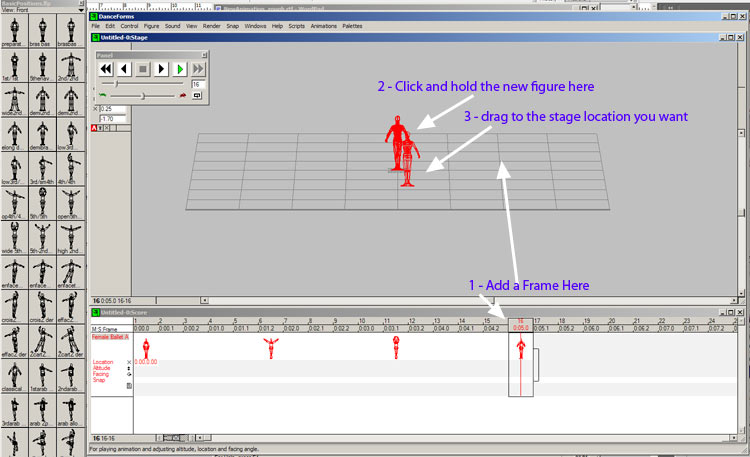
Now Play it again.
7 - Direction of your dancer
Add some direction to your figure if you've done any movement to the side.
To make the movement easier to control, use the rotation sliders on the Stage window to move the stage around and to move the view point above.
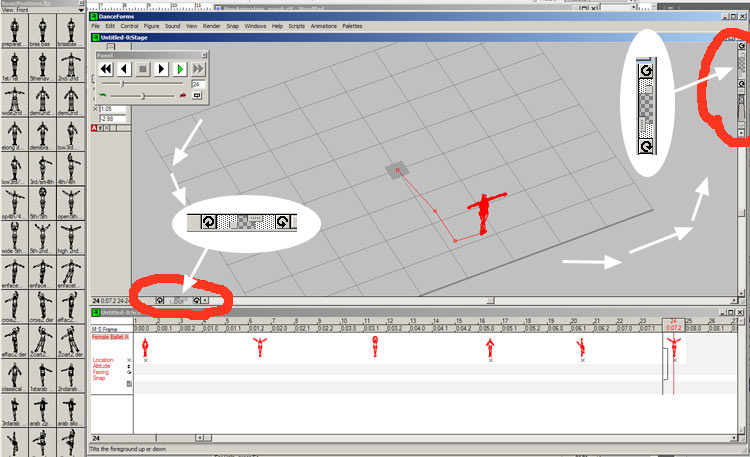
Also at turning points in the path, click on the human figure and use the left-right buttons to turn your figure in the right direction.
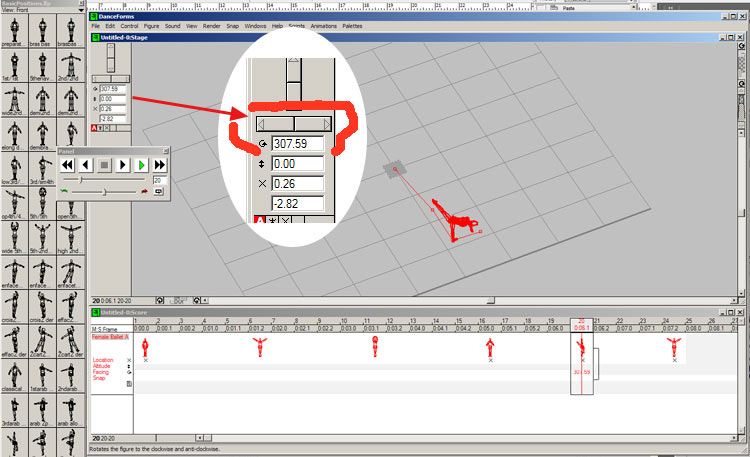
Notice that the rotation angle between the start and the first turn is affected. Make sure you keep the original angle on any figure before you want them to turn. If you do not specifically check the angles (and other settings) the program will give you some interpolated positions yo may not want yet.
Play this again.
Now let's try this with a more rendered look. From the Windows menu pick the "Performance" option
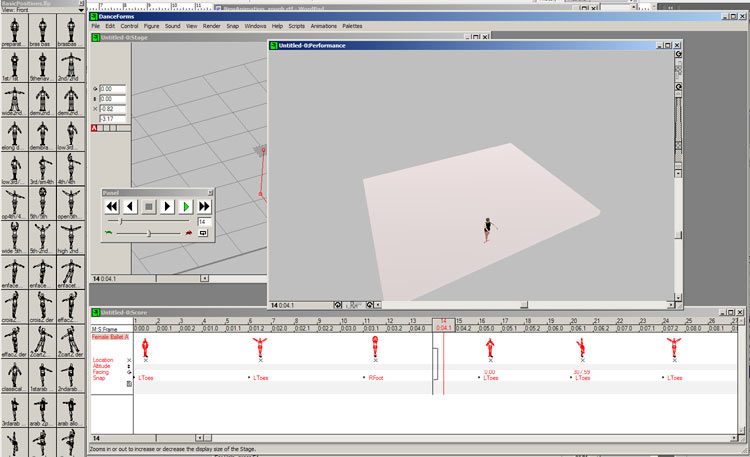
Play again.
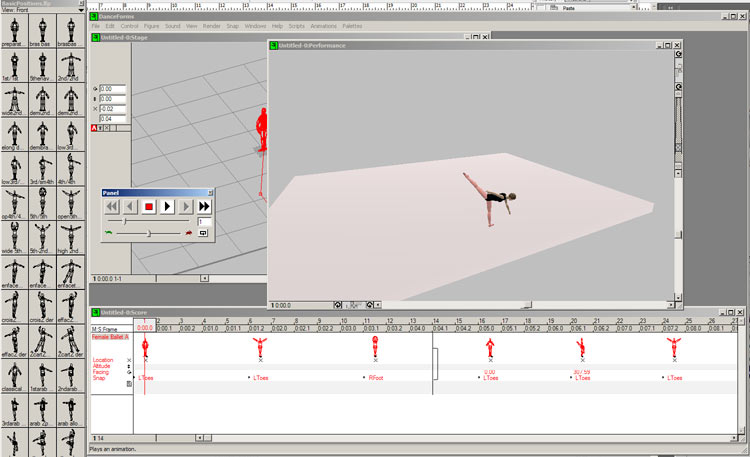
8 - Export (as video)
Now that we have an animation, no matter how rough the "sketch," lets export the animation as an MOV file. For this you need to make sure that you have Apple's QuickTime player installed. The QuickTime player captures the active window in DanceForms, frame-by-frame and does the actual work of creating the video file.
First Make sure that the Performance window is the current window.
Shape and size the Performance window. This will be the size and shape of the video MOV file.
Menu: File / Export
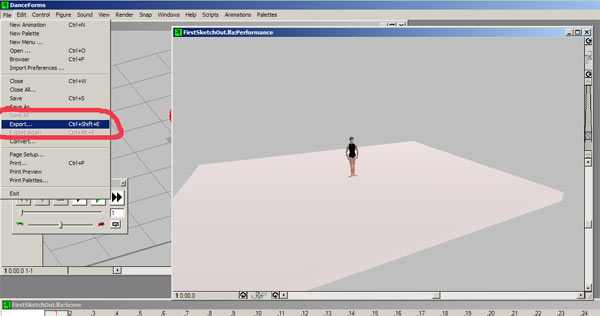
You get an export dialog box.
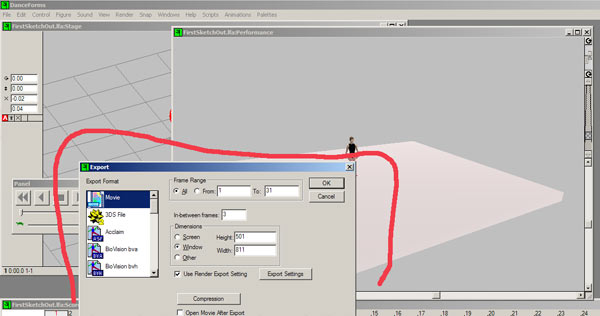
Click the Okay button
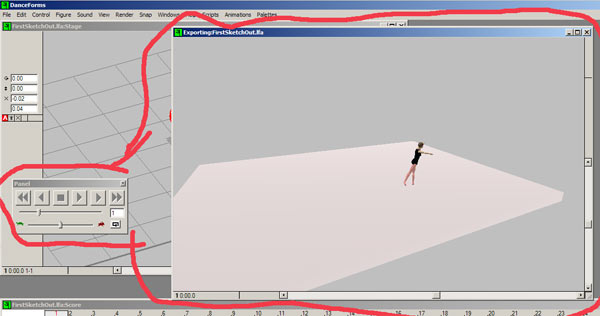
You will see that the Performance window shows a very fast version of the animation. DanceForms is sending a frame at a time to the Performance window and at each frame asking QuickTime to capture that window as a frame in the video file. As soon as QuickTime has captured the window's image (very fast), DanceForms puts up another frame in that window for QuickTime to capture to the video render.
Exercise 2 - creating a Port de Bras
File Menu: Open option:
get the project file: "Exercise2.lfa"
File Menu: Open option:
get the pallette file: "Exercise2.lfp"
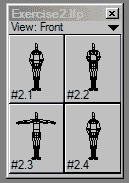
In both cases you will probably be looking for:
C: drive
C:\ProgramFiles main folder
C:\ProgramFiles\DanceForms 1.0 program folder
either C:\ProgramFiles\DanceForms 1.0\TutorialFiles\DF_Practical_Guide_Files exercise folder
or C:\ProgramFiles\DanceForms 1.0\DF_Practical_Guide_Files exercise folder
C:\ ... ... ... ... \Exercise2.lfa actual file (project)
C:\ ... ... ... ... \Exercise2.lfp actual file (pallette)
What we are going to do is:
- Double click the figure to select all parts
- Locate a keyframe in the Score (timeline) window (this will be the frame we will copy a pallette figure into
- Click on a pallette figure (this should replace the contents of the selected keyframe
- Repeat steps 2 and 3 until we have all our pallette positions copied to the timeline
Here is the specific set of steps for Exercise 2

Select the score window (click on it, in frame one)
Click in the studio window and double-click on the figure (to select-all parts)

1
Go to the palette window - click on the first figure (#2.1) (this should replace the starting figure with #2.1
Now got to the panel and click once on the forward step button

2
From here on out we are going to repeat some of this set of steps
Go to the palette window - click on the first figure (#2.2) (this should replace the starting figure with #2.1

3
Now got to the panel and click once on the forward step button
Go to the palette window - click on the first figure (#2.3) (this should replace the starting figure with #2.1

4
Now got to the panel and click once on the forward step button
Go to the palette window - click on the first figure (#2.4) (this should replace the starting figure with #2.1
To see this movie export it and view - The left hand video below is the export at this stage.
The right hand video is the same move exported after adding blank frame between the four keyframes.

Adjust (change) the timing:
Click between any two frames (to get a think vertical line - your insert cursor)
Hit the space bar to add frames
If you click between 1 and 2 you get 1 - 2, 3
If you click between 2 and 3 you get 2 - 2, 3
and so forth
At any point: Render To Video
Start with a project with several keyframes:
File Menu
Export Option
Take the default options for now - revisit this for yourself in the future
This brings up athe "Export" window.
Click the "OK" button
This starts a File-Dialog. Pick a location to save the file and then give it a name
(note: it will already have a default name, based on the project name.
| The export movie before spacing the keyframes | The export movie after spacing out the keyframes |
| To view the difference either click the play icon (left end) or reload this page | |
Further Information
One More Point - Automatic keyframe generation
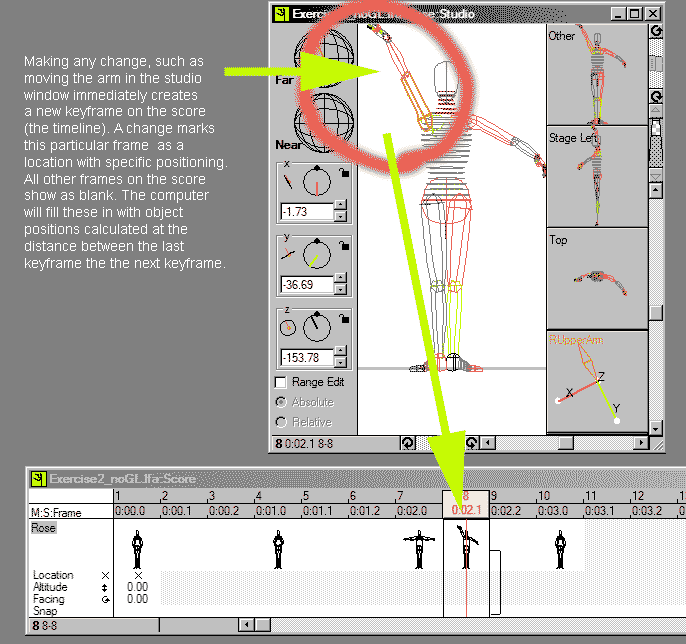
Placing pallette positions on the score (on the timeline) is only the starting point. So far it is more like paint by number. Only keyframes are shown on the timeline. Each keyframe contains information about the figure and the figure's position as well as the figure's position and orientation on the stage. It is that information which controls the rendering of that frame and of the frames between keyframes.
All the blank space between keyframes is filled in by the computer. If you place your cursor on any of the blank areas you will see the computer's interpolation of that frame, based on the last keyframe, the next keyframe and how far between them this keyframe is located. The studio, stage and performance windows will all show what the blank frame looks like when completed by the program.
But you can do more than merely see what the computer will fill in the area with. Any time your cursor is on a blank frame, if you make a change in the figure in the studio window, or position on the stage in the stage window, a new keyframe is instantly created with the new changes.