Equipment - Cameras
In terms of equipment we can get away with a good deal. For most of this course we are assuming a shoestring budget. You can do a lot on a shoestring. (You can even break new ground: see http://www.richardleacock.com/leackessays.html)
Image-Stabilizing Equipment

Camera mounted on a jib which sits on a heavy tripod equiped with wheels to
be able to dolly around the floor.
This unit swings around and dips right down next to the floor as well as lifting
high to about eight or nine feet so that it can look down on the dancers or
on the crowd.
Avoiding Motion Problems
Cameras use at least six different methods of image stabilization, depending on how you count:
- Tripods or other stable support system such as bean bags
- Tripods are the long-established system. They do require set placements of cameras. Good adjectives for a tripod are: strong, metal, heavy, etcetera. For video work or any othe work in which the camera needs to be moving on the tripod (swivel or tilt) requires a fluid head because of its smooth movement.
- Bean Bags - Another time-honored system. They still work well and they are very flexible.
- Cranes, dollies and other camera platforms. Just as with tripods these are designed to be very stable but also to move at the same time.
- Very careful handholding - This is a street technique and something you do when you forgot your tripod. Does work, but needs a lot of care. Still it is a valuable skill for tight spots. The rule of thumb for the lowest shutter speed for any lens focal length is one over the focal length in millimeters. For example a 50mm lens should not be handheld at less than 1/50th of a second. You can push this. I have a lot of experience pushing the bottom end of this. Just don't expect tack-sharp wall-size prints.
- SteadyCam-type devices - These are systems in which weights and/or gyroscopes on fluid joints dampen your movements so that the camera (video or film) remains smooth. The shots allow the camera operator to move and still keep the video looking fluid. They usually have some sort of harness worn by the videographer and on which the camera is mounted. The camera is mounted on the device.
- Optical Stabilizers for the lens - Uses optical elements within or behind the lens which move on tiny servos in the opposite direction of any movement of the camera. The full area of any image sensor is used. Canon IS (Image Stabilized) lens and Nikon VR (Vibration Reduction) are the principal camera makers with this type of stabilizer.
- Digital Stabilizers - not prefered (use the optical) - These work by using a smaller than maximum area of the image sensor for the picture. The extra chip area is used selectively depending on movement amount. It works by tracking movement in software which detects changes in the image movement. As a result it sometimes as artifacts where false movement is detected.
- Stabilizer for the CCD chip - introduced by Minolta. This moves the CCD chip (the image sensor) rather than a lens element. This actually uses less energy and works well. Reports are that you can handhold with a 200mm (equiv.) zoom at only 1/30th of a second. Without stabilization the rule of thumb would require at least 1/200th of a second.
Devices You Operate And Your Budget
Shoestring
Bean bags
Counter tops
Camera strap under tension around your head and shoulders
Cheap tripod and careful, heavy hand
Table-top Tripod
UnipodSpare Change
Good Tripod with fluid head
Do-it-yourself dollyActual Budget
Steady Cam, Glide Cam, or other brands of gyro-stabilizers
Jib (articulated parallel boom) - mounts on tripod or other stand
Dolly - $40 and upDaddy's Money
Copter Steady Cam
CranesOr for just the most professional looking results in a simple kit
Good tripod
Good Fluid head
Dolly (something you can make for yourself)
Jib with weights (if you have the money)
Motion and Color Blur
In addition to image detail blur from motion the colors of the image also blur. When colors blur they normally blend in a way which makes them deaden. Often the tiny color differences between color patterns on clothing which we don't conciously notice are the elements which blend, deadening those colors. Anything which stops the motion which causes the color blur will also brighten the colors as photographed. For example strobes, which operate at 1/1,000th of a second or faster provide crisp details and saturated colors (when properly exposed, of course).
Cameras
Digital is best
Then the word is
control, control, control.
Big, beautiful, manual control.
More than anything else you need control over two items, 1 - exposure and
2 - white balance, normally in that order. Exposure is almost always the
single most important item you wish to be able to control manually.
What If I Don't Have Manual Control (of my camera) and my "putt-putt" camera is all I can afford for now?
Don't put, put your camera down. Be happy! Use what you have. Limits like that make us work harder and concentrate more. True. Big budgets and all the great equipment you barely know how to run are not really the secret to good output. Count how many shoestring-budget directors with acclaimed films get big budgets finally and turn out snoozers. Work what you have. Work the content. In the example below of why automatic exposure is a pain, notice the framing work-around of changing where light and dark masses are in the viewfinder. 'Tain't Hollywood, but it can be good. - anyway!
Exposure control (usually aperture and in some cameras shutter speed) keeps your camera from trying to "help" you. Automatic exposure means your loose control over the image. Look at this series of still captures from video of Leonard Reed in his Hollywood office ( November 1999). Leonard Reed left Kansas City in about 1925 and spent a life in show business - he is still in the business and still coaches and gives workshops (he was born in 1907). Leonard is black, white and Choctaw and spent his career in black entertainment as dancer, producer, choreographer and more. He is given credit for originating, with partner Willie Bryant, the Shim Sham Shimmie in 1927 (a tap dance standard), was emcee at the Apollo and is the last living producer of the Cotton Club. Leonard and fight champion Joe Lewis were long time friends and went around the world playing professional golf tournaments as well as doing a stage act together, including the Ed Sullivan show.
Exposure Control - Automatic Versus Manual Automatic: The horrors of getting too much help. As you look at the series of captures notice the light and dark areas of the composition. Notice how changing the proportion of light to dark in the frame is noticed by the automatic exposure control. Although this shows you a compensation to try to overcome the loss of Leonard's facial detail when a very light area (the window) begins to occupy more space in the frame. This shows a clear need for manual exposure control in order to overcome the "helpfulness" of automatic exposure control. With manual exposure we would have had a much larger range of compositions without losing facial detail. 1 - start of clip. Black shirt helps balance light in window. Notice the relative percentages of light and dark in the frame. The eye sockets are a bit dark. 2 - camera moves very slightly upsetting the light/dark ratio. We loose Leonard's facial detail. 3 - A little more window. Leonards face is harder to see. Look at the change in percentages of light and dark in the frame. 4 - Now we are trying to correct for the autoexposure by changing the composition to include just the area most important to us - in this case Leonard's face. 5 - As we zoom into Leonard's face the camera begins to open up the diaphram. 6 - Closer yet. By this time the camera is getting the exposure for Leonard's face. But we really don't want the entire taping to be an Extreme Close-Up (ECU). 7 - Exposure is now okay for Leonard's face and we will attempt to change composition so we can back off. 8 - By putting Leonard's face in the corner (obsuring the lightest areas) we can have a little more surrounding area and still see our subject's face. His eye sockets also show more detail than #1. See this example clip of Leonard (16 sec) :: 56kb or 128kb connection (RealMedia) Manual: In this set of still captures from video the camera and the people are in flux but the camera's aperture, shutter speed and gain were all set manually and never changed all the way through. Look at how the exposures remain relatively the same regardless of whether the camera is pointed toward the windows (the source of light in the room) or away from the windows and into the room. Some exposures change because of the relative distance of the subjects to the light source (the windows) as they move within the ballroom. Unlike the still captures above none of the captures below go dark because of backlighting. Play the full clip below. See the full clip using manual exposure in a situation with a lot of movement for both camera and people. This is at Camelot Ballroom (151st street in Overland Park (Stanley)). There are large windows in the background providing most of the light in the room. Notice how the exposure, set for facial detail, remains the same even though the ratio of light and dark areas in the frame changes greatly.
(2 min 58 sec) :: 56kb, 128kb or 512kb (9.8megs) connection (RealMedia)About the piece. The Birthday Club was started in the early 90's. It is largely retirees, by invitation. They have a ball four times a year. Whoever has a birthday during that quarter pays that day and the rest dance for free.
Color Balance For Lighting
This is a comparison of White Balance Settings on a white paper. The lightsource in all cases is daylight, cloudy bright. Each white balance setting is a compensation for the spectrum put out by each type of light source. Using the right white balance setting produces correct colors. Light Source:
Cloudy Bright Sun
Use a White Card or white, flat surface, such as this one to set the camera's custom white balance setting. White Balance Set to Daylight Set to Tungsten Set to Flourescent Using a White Card White balance is how you achieve good color rendition. In the "old days" we used to buy indoor or outdoor film. Outdoor film was designed for the spectrum produced by the sun. Indoor film was designed for the spectrum produced by tungsten light (normal light bulbs). Tungsten is very red in color compared to the sun but we don't normally notice because the combination of our eyes and brain conspire to keep adjusting the way we see.
Our eyes are constantly making color adjustments. A white piece of paper as seen in the sun still looks white to us when we look at it under tungsten light. Unless we are looking at that piece of paper under something such as theatrical gels our biological systems are making corrections before we actually "see" the image. Cameras (having no real brain) are not able to make these adjustments so we have to conciously make those adjustments for the machine.
A camera whose white balance is set for sunlight will make a very yellow-red looking picture of a white piece of paper if the paper is in tungsten light. On the other end a camera whose white balance is set for tungsten light will make a very blue looking picture of the same piece of white paper when the paper is in sunlight.
When white balance is set, whether automaticaly or manually, the camera assumes that the "target" is neutral in tone, such as white, black or any gray in between. When you use a white card or a gray card to manually set the white balance this is true because you control the color target. The other option is one of the "presets." Setting the white balance option to daylight or tungsten or flourescent assumes the lighting for your scenes is identical to the preset. When the camera sets white balance automatically, the entire scene is treated as if all the colors in the scene were blurred together and then used as if the blurred colors were a gray card, regardless of the actual color. As a result, automatic white balance keeps changing.
The original version: not corrected and too red from the tungsten light. Second version, color corrected. Different mood and sense. Converting to B&W works best from a properly color corrected original. White Balance is the difference between a muddy picture and a clear picture. Above is a pair of tangoers, shot Fedora's 210 on the Plaza in Kansas City (George Brett has since wiped otu this classy restaurant for a sports bar and a sports gear store. The picture on the left is uncorrected. The picture on the right is color corrected in Photoshop. Notice the livelier look and the clearer detail. Below are two other examples.
Same location setting white balance for open shade (usually a Cloud icon in the camera.) Much brighter, livelier image. A few minutes later with white balance set for sunlight. Now we can differentiate the items in the picture.
Sara holds up a gray card so that I have an exposure reference in the scene (summer 1976, portrait session).
I meter off the gray card and I later use it to set the right exposure in the darkroom for the enlargement.
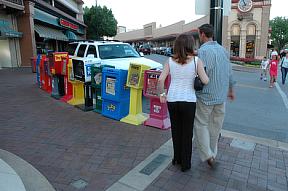
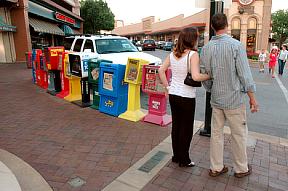
The images on the top row are what you see and what the camera records. Except for the truck drawing, these are all still captures from video. The images on the bottom row are blurred versions of the picture just above. This is equivalent to the way a camera's exposure and white balance systems electronically "blur" the scene by sampling pixels for overall exposure and for overall color cast.
In effect, the camera treats the scene as a gray card.You can tell that each frame has different overall luminence and different overall color cast. This is the reason that automatic controls can wreck your picture and leave you with scenes which don't match each other. The truck drawing is overly warm for a typical outdoor scene but tungsten lit scenes (regular light bulbs) are very yellow-reddish. The point is that you need to have manual control over color and over exposure in a scene. Manually Setting White Balance
Although a "white card" is common any neutral-color (white, gray, black) target will do as long as the camera will let you make the adjustment. A gray card is a standard item in camera stores and handy to include within the scene to assist later in color balancing.
Small Trick: You can tune the balance so the picture looks very slightly warm by white balancing on a surface with a small hint of blue or cyan. A standard tablet with blue lines will do (lower right illustration).


Digital is not the way to go for:
1 - Image stabilization - Use OPTICAL stabilization. Optical methods use an optical wedge method using the entire chip. Minolta developed a method of moving the entire chip. Digital stabilization works in part by using only a portion of the entire chip's image area. It is also subject to artifacts of movement in the frame when at times it can't determine the difference between subject movement and camera movement. Or when it tries to compensate for camera movement which the camera is moving with the subject.
2 - Zooms. Digital zooms are not really zooms. This is just a method for enlarging the central region of the image area with all the zaggies and pixellation artifacts you get from that, even though smoothing methods are added to make the digital "zoom" more palletable. Because a smaller area of the chip is used to produce the image the overall image suffers badly in term of resolution. Only optical zooms are real zooms (variable telephotos) and always use the full imageable area of the chips.
IEEE-1394 ( a.k.a. Firewire™ )
vs USB 2.0
This is an Apple patent. Although it has an IEEE description Apple trademarked the name Firewire™. Sony implemented it's own version and called it iLink™. Everyone else is standard just calling it a 1394 connector. This is a fast serial protocol for moving data at a rate of 400 mips. USB 1.0 is a fraction of this speed. But, in numbers the USB 2.0 standard, at 480 mips is faster by 20-percent but in practice the actual speed of the USB depends on other CPU activity. A computer busy with other tasks can cut down the USB speed far enough that a 1394 connection can outpace it easily.
The IEEE-1394 connection runs independently of the computer's CPU and therefore is not affected by computer traffic which is not sent via the Firewire™. One note on 1394 dependencies: getting the data to the Firewire™ and saving the data from the Firewire™ does take CPU cycles but they are the same ones that would be needed to get data to or from a USB cable as well. That means Firewire™ is still the choice over USB 2.0 even though the un-impeded throughput figures for USB 2.0 are higher.
Image quality and Chips
Digital Cameras use three different types of image-sensor arrangements, Single-Chip CCD, Three-CCD Chips and Foveon chip. At this writing no video camera uses the Foveon chip yet and only one still camera, the Sigma D9. In general three-chip cameras give better images than single-ship cameras. All things being equal in terms of shooting, shooter, equipment, etcetera, three chips always give better results than single chip cameras. But the difference is small enough that you may not see the difference without a cue card. In either case the single-chip cameras need offer no apologies.
All digital cameras pick up the image in three primary colors: red, green and blue. (If you were thinking that red, yellow and blue are primaries your are right, for paint and other pigmented color materials which are seen by light reflected from them.) Red, Green and Blue (RGB) are light primaries for colors seen by transmitted light. Television uses the RGB colors. Printing on paper with four-color printing uses the light primaries, Cyan, Magenta and Yellow. To cure purity problems black is added in printing to get proper color density and contrast. (CYMK color)
All we will use here will be RGB (red, green and blue) colors.
Film pictures exhibit grain. Grain is the microscopic structure of film and represents the smallest unit of the image in film. Depending on film, exposure, developer and development methods film grain can be very fine or coarse. Grain shows up in random order in the film's emulsion. That randomness in placement and size gives film subtle and smooth gradation (change rate between light to dark) which digital is still trying to come close to matching.
Digital pictures exhibit pixels. Pixels are the smallest image unit in the picture. They are always in a regular order regardless of whether they are created by rendering or directly from the image chip. Where color film has three emulsions each on top of the other, one for each color, digital chips have four pixel positions arranged in patterns of red, green, blue, green. These individual patterns are part of an overall checkerboard like pattern called a Bayer mosaic. The Foveon chip is the only chip in which the sensors for each color are arranged on top of each other physically, as with film.
 The components of the single-chip Bayer mosaic pattern shown at the right. Notice that there are twice as many green pixels. Kodak scientist Dr. Bryce E. Bayer invented this mosaic pattern for color image systems in the mid 1970s for both rgb and cmy sensors.(patent granted in 1976 - In his patent what we here use for green was only for luminance information and the colors of the other two was not specified) This illustrates a current typical RGB sensor. |
 |
You expected that single-chip cameras would have red, green, blue pixels? Nope. Humans are more sensitive to green than any other color and so to get colors closer to what your eye sees the extra green sensor is used. But, unlike film, the sensors are not on top of each other (except the Foveon chip). What that means is that although each pixel position is a basic unit of the picture it is only recording one of the three colors at its location. To make up for that all single-chip cameras (keep excepting Foveon, of course) have to make up the other two colors at each pixel location by "interpolating." This means the camera's software looks at the colors around each pixel and uses their values to determine a value for the non-recorded colors.
That means that:
1 - Each red pixel position has to Interpolate from pixels around to get its
green and blue.
2 - Each green pixel position has to Interpolate from pixels around to get
its red and blue.
3 - Each blue pixel position has to Interpolate from pixels around to get
its red and green.
In the process of interpolating, the derived pixel colors are blurred before averaging. Although most single-chip color cameras use chips with the pixels in straight rows and columns, there are variations on the scheme. Fuji, for example, uses a set of honeycomb-shaped sensors in a tighter pattern. They call it a Super CCD. Sony just introduced (fall 2003) an 8 megabyte chip in which one of the two green sensors (in a sensor set) is an emerald green, contending that this makes their color rendition more accurate. This is similar to the emerald green in Pantone's Hexachrome printing colors. Sony calls their new 8 meg chip an RGBE chip, rather than an RGB chip.

In a three-ccd camera the red, green and blue parts of the image are separated into three streams, red, green and blue. Then a single-chip for each color records all the pixel positions. The red, the green and the blue pixels from each chip at each corresponding pixel position are combined to form a single RGB pixel in the image.
The colors are separated by dichroic filters. Dichroic filters (also sometimes called dichroic mirrors) do not have pigments or dyes. Dichroic filters are clear coatings on glass which are the exact thickness of the wavelength of the light color they are designed to pass through. All other colors are reflected. That is the "DI" in dichroic, light is separated into two streams, one which goes through and the rest which are reflected. As dichroic filters are tilted at an angle to the entering light the length of a path through the coating layers changes meaning that the wavelengths of light which pass through and which reflect changes.
The Red, Blue and Green CCD are actually not colored at all. They don't need colors over the pixel sensors because they are receiving light from only portion of the spectrum.
For an article on the net which directly compares the Foveon X3 sensor to Bayer-pattern sensors go to http://www.ddisoftware.com/reviews/sd9-v-bayer/. (this link opens in a new window)
"Real" Cameras v "Amateur" Cameras
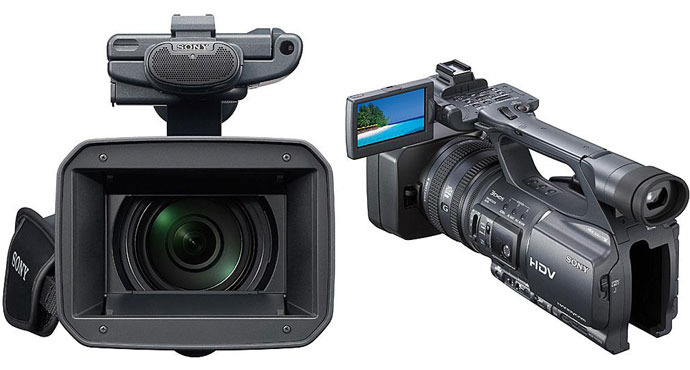
Sony FX1000 at $3200
Panasonic HMC-150 at $4000
First, let me tell you that you do not need a professional camera to produce worthwhile, even broadcast quality, output. Pro cameras give you extra controls and capabilities you really can't get at the consumer level, or even the "prosumer" level. For that matter, today's prosumer easily matches and exceeds yesterday's top flight professional camera.
Today's consumer cameras produce so much quality that you won't see the difference easily, if at all, on a regular television. Maybe not even on studio monitors. Even HD (high definition) is beginning to get into the act with new HD camera introductions all the way from $100 to $100,000. "Prosumer" models with more than broadcast quality can be had for $3200 to $4000 or less. That $200 or $300 pocket camera with HD video will turn out video which won't match pro or prosumer video quality head to head but which will be perfectly acceptable just the same.
My off-the-cuff comparison of the FX-1000 and the HMC-150
I bought a Sony FX1000 last year (2008) the day after thanksgiving in a sale at Sony Style on the Plaza. Later I felt that maybe I was missing something after reading specs and glowing reports for the HMC150. So, in January I bought the HMC150. After that I bought another FX1000.
The Sony definitely kicks butt. Fabulous resolution and great low light response. But the real kick is in handling. With 3 rings on the lens control is very fast, fluid and precise. Really, really pretty adjustments. Zoom is quick and delicate, perfect for quickly changing dancers so that I can pull out as fast as dancers go up into a lift or leap and then back in.
The Panny by comparison is anything but well designed in terms of handling. Stuff is all over the place in buttons, menus, sometimes single functions are split between controls.
The Sony will go a good 1.5 to 2 stops darker with a still very clean image at 21 decibels, all in one totally smooth and fast swoop of the exposure ring.
The Panny is stuck at a max of 12 decibels gain unless I have a particular combination of frames per second and scanning spec and then have the 18db boost available by pressing one of the three function buttons on the side of the camera, rather than being a further position on the gain switches at the bottom left side. There is also a menu setting for one of two double setting choices (6 & 12 or 12 & 18), rather than just giving me all the settings on the switch or on a gain wheel. Very awkward and I really don't see why.
An other comparison is the viewing angle of the LCD panel. The image looks much the same on the Sony at a wide range of angles where the Panny only looks right in a narrow range so controlling exposure and controlling the look from the LCD is really more difficult on the Panny. On the Panny, the viewfinder is the only stable way to view the image for reliable evaluation and adjustment.
The one thing which is really massively handy is the SDHC card in the back. This postage-stamp size memory card can hold 98 minutes (16gb) at highest quality and 6 hours at lowest quality. Sometimes that handiness overrides all the advantages of the Sony.
And as far as memory cards go, I purchased 30-megabyte-per-second cards. Turns out I really need that data rate to make sure I am getting the maximum quality I designated in the Panny setup menu. I found this out when I tried a memory card I was using in the HMC-150 in a Panasonic Lumix DMCFX-37 point and shoot.
The DMC-FX37 refused the card for video because it wasn't fast enough. That meant that the HMC-150 wasn't telling me it had a problem. Instead, it happily(?) used the card and recorded on the card. Did it shift to a lower quality recording without telling me?
You can also buy a memory card recorder for the Sony (CF cards). I bought one (about $900 + $300 for the 30mbs 16gb cards). It works off the FireWire port and anytime I hit the record button with a miniDV tape, the Sony records to both the tape and the memory card recorder. No sweat. If I have no tape in the camera I need to hold the play button on the memory card record and press the record button. A bit more ackward but workable. This unit gives me 75 minutes on a 16 gigabyte card.
If I had realized how well this works (except for a little problem with loose battery) I might have paid more and bought up the line to the next model which has this built into the back end.
One caveat for both the Sony and the Panasonic about memory cards. They both use the FAT-32 file system which limits the maximum file size at 4 gigabytes, or about 20 minutes time. Unlike the FX37 and various other cameras which stop recording at the 4-gig limit, the Sony recorder and the HMC-150 simply close the current file and start a new one. That is okay but it loses a few frames of sound at the end of each first file. No loss of picture frames.
The 1440 pixels of the Sony (recorded to tape) vs the 1920 pixels of the Panny (recorded to SDHC card) is not a score which means a lot in practice. Actual use has the Sony kicking the Panny down the hill on resolution.
The Sony actually "sees" the image at 1920 pixels then saves it to tape as 1440 pixels, compressing it horizontally by 25-percent. Not unlike what an anamorphic lens does on a movie camera though for different reasons and with different technology. On output, it is expanded back (by 1/3) to 1920 pixels resolution.
For editing I use Sony Vegas Pro. The mix of HDV and AVCHD is sometimes painfully slow. HDV only or AVCHD only works with less fuss. As far as best resolution in the edit, it always does its best as the natural resolution of the source files. for the 1920-pixel files setting edit resolution at 1920 looks good but any mix of 1440-pixel files won't look as good. The same thing in reverse. Setting the editor to 1440 gives a great look to the HDV files and a not-so-sharp look to the 1920 (or other resolution). Actual rendering does a better job of appearance.
If I white balance them together they do tend to come out pretty close but I still need to do some adjustment (color) in the editor. In the Panny there is a slight "powdery" look to the image with good resolution and nice gradation but not as crisp a look as with the FX1000 which tends to be crisper and maybe a wee bit more saturated in color. The FX1000 seems to carry a tad more contrast and a tad more edge definition, but not sharpened definition, maybe just a more contrasty illumination channel.
Both run profiles in which you can extend the shadow and highlight tonal ranges. Here I like the Panny's selection wheel at the back of the camera better. The Sony uses a menu with a special profile button on the camera body. Both really do work well and give me a lot of extra image in areas I would tend to loose detail in with my old Canon and Sony SD cameras. I really like that feature. Makes a huge difference in the picture though at first it seems I've lost a little contrast, which is really just a longer tonal range brought into a similar edit space.
In 1994 I bought a Sony Hi-8 camera on the return shelf at Circuit City for $1,600 (the chain went bankrupt and was dismantled in early 2009). The Sony Hi-8 was a bargain because its retail price was $2,500. The equivalent Hi-8 today is about $300 or even less. In 1990 I bought a Digital-8 for $1,000. It was a good deal. The equivalent Digital-8 today is about $400. My 3-CCD Canon GL2 cost me $2400 street and listed at $3,000.
Prices on Canon GL2s are still up there for now but Samsung just introduced a MiniDV camera at $400. I have to confess it is hard to see a full $2,000 difference in list price between my 3-CCD and my one-chip camera. I do see the differences in resolution and color depth but the visible difference is not huge, just a "professional distinction."
In the chain of items which are most important to picture quality the format's data specification is first, matched closely by the quality of the recorder in the camera and the lens. The data specification is a fixed standard. Most lenses will exceed the ability of the recording mechanism so the recorder is usually the most variable quality-assurance link.
So don't get camera envy. I've met enough persons with expensive machines who got lousy results because they didn't know how to use them. What's more, that consumer camera is good cover and lets you get into more places than the expensive machine which can be very intimidating.
And for an interesting take on Hi-8 cameras (1993) and later innovations in equipment (pro and non-pro) check out the essays on Richard Leacock's site at http://www.richardleacock.com (or the essays directly: http://www.richardleacock.com/leackessays.html). Leacock was one of the original cinematographers credited with inventing Cinema Verite with Robert Drew. He started fliming early in his teens, during the 30's. His family knew Robert Flaherty. In the later 1940's he worked with Flaherty. Later he worked with Robert Drew on the 1960 documentary "Primary" which covers the Wisconsin Democratic primary between Hubert Humphrey and John F. Kennedy