Digital Video Editing
Multi-Camera Synchronization
In this example we show another video using two cameras. In this case a 15-minute piece. There are four illustrations. Note again how the sound-wave pattern is used to line up the two pieces.
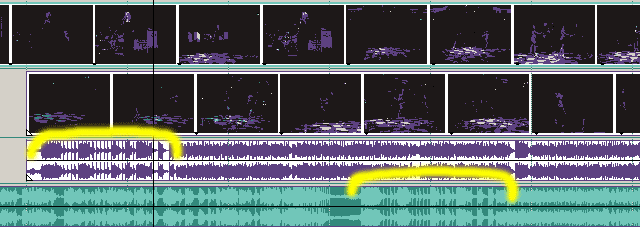
1 - Here is the first drag and drop. Note the distinct patterns made by the sound waves.
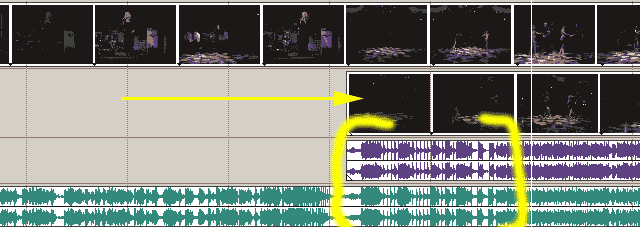
2 - Now we've made the first track move. Simply drag the middle track toward the right to get a line up vertically of patterns. Now we need to enlarge our view in order to better line up these tracks.
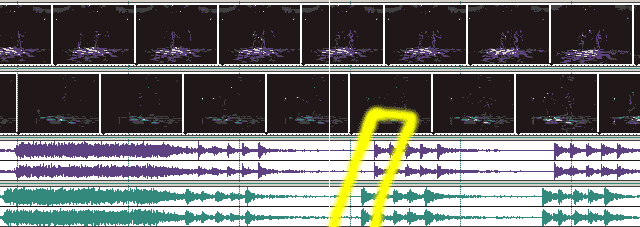
3 - On enlarging we can see that we have a ways to go. Let's enlarge further and line up again.
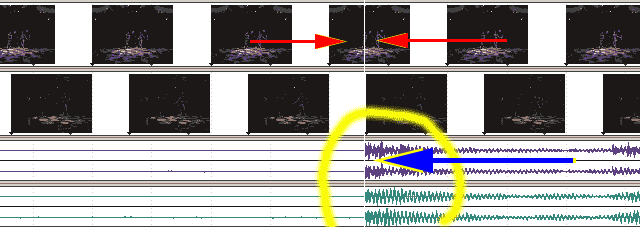
4 - Final track alignment. The track area is now much more enlarged. It is now easier to see the small divisions. Use the edit cursor to help you visually line up the sound-wave patterns. Then save the project. The red arrows point to the edit cursor location. The yellow circled area is the same wave pattern we see in the illustration above. The blue left arrow shows where we moved the middle video/audio track to get this match up.
Compared this one to the example in the exercise and you might notice that we used only the sound tracks to help us make the match. We didn't need to use opacity to try to align the pictures on the two tracks.
Video Example - Synching Up Using Sound TracksIn the flash video below you can watch as the tracks from three cameras and a sound recorder are lined up in synch with each other. The video can only line up so close when there is no genlock. Usually you will be some part of a frame out of synch but it is normally close enough. The two top sound tracks are from the cameras (matching the video tracks above them). The cameras get their sound from radio mics on stage, received at camera position and fed into a small sound board and from there out to both cameras. The bottom sound track is directly from the digital audio recorder and the track above that is a normalized extract from that file which is to be used for the final sound. Note that the two top track wave forms differ in appearance from the wave forms from the digital audio recorder. The two cameras are the same model camera. If these came from different cameras the wave forms would look different again. The device or devices you feed the sound through greatly affect the appearance of the sound waves, even though the sound will seem the same. In order to determine how to match up the tracks so that they line up with each other, I keep changing the horizontal scale (size) of the track (zoom in or out) using the up/down arrows or the scroll wheel on the mouse. |
| NOTE: This Loops continuously so it will keep playing |
Digital Video Editing
Hints for Shooting with Multiple Cameras
#1 hint - Keep the cameras running for the entire tape in each camera.
This will use a lot of tape but it will save hours and hours of edit time. Don't worry about all those minutes of tape where you are resetting the camera, wandering around, out of focus and so forth. You will see the payoff later in terms of saving you tremendous amounts of editing work and time. This allows you to sychronize the tape captures once for the entire run.
If you don't keep the cameras running - that is, if you keep hitting that red button to start and stop your scenes (handy for automatically splitting scenes in the editor) - you will get extra hours of time trying to match up scenes. Then you will know why you just keep the tape running in this situation.
There is one other reason, even when you are moving the camera to a new setup location, you are recording sound from around you. This way you have a full soundtrack, such as a band playing.
#2 - If you have it available - use genlock - so that all cameras are sychronizing frames.
A Couple of Terms
- Time Code - the tape counter in hours:minutes:seconds from start to finish for each tape from 00:00:00 to the final hours:minutes:seconds on that tape. Every camera, like every clock or watch, runs at a slightly different rate. (Even thought this is recorded in hours, minutes, seconds time code is NOT time-of-day clock time, which is also recorded - just the amount of time recorded on a tape).
- Time Code Locking - when cameras synchronize their time counters so that they keep a matching set of time codes for each tape. BE CAREFUL - this, used alone, has potential problems and results in tape glitches if not used with genlocking.
- Genlock - The most important synchronizing method. This uses one source, often one of the cameras, to trigger all of the cameras for each frame of video. It works like a master metronome. One source tells all the cameras when to record frames so that all the frames are started at the same time. They are in "lock step" with one master timer.
- You could think of genlocking like the drum "beater" on a galley in one of those old "sword and sandal" movies where each drum beat means the galley slaves pull on the oars so that all the rowers work together.
- The "gen" in genlock is because a "signal generator" creates (generates) a pulse at regular intervals. That pulse is sent out to all cameras and causes each camera to generate a frame of video. The "lock" in genlock is because all cameras are locked into one signal generator for all (remember, each camera has its own signal generator for its own use, it is just that they don't all have exactly the same timing rate). Genlocking bypasses each internal signal generator in favor of a common-to-all signal generator.
Note about time code locking and genlocking:
Genlocking controls WHEN frames are created for all cameras. Time-code locking controls the counter (time code) numbering for each camera. It is a convenience for working with genlock which makes it easier to find matching sections of tape. But it doesn't synchronize the recording itself, worse, it can cause un-fixable glitches. If you lock ONLY the time-codes you have to remember that each cameras own internal clock runs at a slightly different speed. That means that at various points (too numerous) the "slave" camera(s) have to adjust their own internal clock (timing generator). When that happens you get a glitch which amounts to lost frames. Unfortunately, this can't be fixed in post-production.Unless you have more expensive systems, or studio systems, you probably don't have genlocking available to you. That goes in multiples for anyone taking this course and for most "guerrilla" video makers. For most purposes you are fine. Just do the best you can to match clips from one camera to the next. Without genlock matching action will only be as close as the frames are able to line up. In other words, the action will be slightly mis-matched by something less than 1/60th of a second (half the difference of 30-frames-per-second). Just enough to be noticeable but usually not bothersome - just depends on how much and on what you are looking at. You may see it more than your audience.
If you don't have genlock, the long quantities of video will match at one end but not at both ends (probably). So you need to match the scene at the start and adjust the length to match the "master" clip on the end. This is the same control method you use to speed up or slo-mo the clip.
Sound Synch and Recording Distance
It is important to remember, especially when shooting from a distance of more than a few meters - at normal room temperatures each 37.5-feet sound traveling at about 1,100 feet per second requires a frame of video at a rate of 29.97 frames per second.
That means that at about 35 or 40 feet the sound is one frame late. In White Recital Hall the stage is about 70 feet from the back of the house. If you are shooting from the back of the house in White Recital Hall you will be close to 2 frames out of synch.
So, every "clop, clop" of the toe shoes will be late. Every tap from tap shoes will be late. Even singers will seem to be late. So you have two solutions available to you.
1 - Record the sound from the front of the stage, the apron. Feed it back via long XLR lines or use radio microphones. This way the sound and the picture arrive at the camera the same time meaning that sound is recorded accurately with the picture. This is the best solution.
You should record the sound from the location nearest to where the dancers hear the sound.
2 - If your sound came from a distance from the stage - ungroup (separate) the sound and the video tracks so that you can slip the sound in the digital video editor until the sound track matches whatever percussive sounds are coming from the dancers, usually from feet on the dance floor. Toe shoes and tap shoes are the most obvious places to match sound peaks against foot contact. Any other place where a visual cue accompanies a sharp sound will help you to match the sound track with the picture. This could be hand claps (such as palmas in Flamenco) or scenery changes where one piece of scenery contacts another.
Speed of Sound - Out-of-Synch Frames Calculator